Proper use of Light will Improve your Finish
& enable you to really SEE what you are looking at.
Lighting for shop work and finish room areas, and its correct use,
is important for obtaining high quality good looking finishes.
Lighting and Color
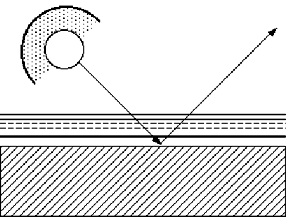
With translucent & clear furniture finishes light travels through all the finish layers and is reflected off the wood or substrate. The ‘Observed Finish Color’ is a combination of all the color tones in the various finish stain & dye layers combined with the wood color.

Finish Diagram of Clear or Translucent Furniture Finishes
Light travels through all the finish layers.
The Finish color is a combination of all
the colors in the various finish layers
combined with the wood color.
When studying a color we notice that its hue will vary depending on illumination and its surroundings. Illumination changes the color hue of an object due to the color available in the light source. Color is the product of wavelengths that are either absorbed or reflected by the surface of an object.
see: Color Theory and color mixing for the woodworker.
The hue appears to alter according to a colors surroundings. Our retina is affected by these wavelengths and the stimuli are communicated to the cortex, that part of the brain that enables us to distinguish one shade from another.
Light bulbs are available in:
1 – Warm white or soft white (2700-3600 °K)
2 – Cool white (3800 -4800°K )
3 – Daylight or Full Spectrum designations (5000°K) or higher.
The color spectrum output of a bulb is rated in Kelvin° color temperature (has nothing to do with the heat a bulb produces). Full Spectrum Daylight bulbs for incandescent and compact or linear fluorescent are available in a range of wattages and styles.
You need the entire color spectrum in your light source to evaluate or match stain and finish colors accurately. Full Spectrum Daylight Bulbs with a high CRI (color rendering index) are a must. Better daylight bulbs will list the CRI on the package, the higher the number the better. A CRI above 85 is good for shop use. Bulbs rated above 95 are expensive and are not needed for wood finishing.
The very best light for critical color matching work is natural daylight (out of direct sun glare).
SEE what you look at !
Proper use of lighting will automatically improve your finish quality.
When you can really see what is happening the finishing process is easier.
Now you have the right light to see color – Correct use will enable critical evaluation of the surface condition prior and during the finishing process.
Fluorescent lighting (Cool White or Daylight bulbs only) is fine for ambient lighting or general work area illumination. Avoid using warm white or soft white bulbs they bathe everything in a yellowish light. The shadow-less lighting produced by fluorescent bulbs tends to hide surface defects.
Inspection Lighting:
A shadow producing light source is necessary to see that a surface is free of any unwanted defects.
Use incandescent bulbs in a reflector for inspection lighting in:
1, surface prep areas (sanding, dying staining)
2, finishing areas
3, final rub-out, waxing or polishing.
Arrange inspection lighting so that the light is aimed at the work and toward the operator so that any defect is accentuated by the shadow or reflection it produces. When you can easily see: scratches from sanding, glue smears, minor dents, brush marks, finish drips, runs, curtains or sags, and polishing or rub out marks it will be much easier to achieve the desired, defect free, finish look.
•••••
This page & all contents Copyright © 1995-2020, Ron Ashby & Shellac.net Wood Finish Supply.
All rights reserved – (may be used in complete form with credit line above)


